 |
DIY • Do it Yourself • Weekend Projects • BIG Projects • LITTLE Projects | |||||
|
DIY • Do it Yourself • Weekend Projects • BIG Projects • LITTLE Projects | |||||
How Do I Share My How-To?It's really pretty easy, pictures and videos of the steps it takes to complete your project are stored on YouTube and picasaWeb. Once your "final" video is stored on YouTube, your project will show in the listings on the site. All this is controlled by our Creator's Tools. Basically, you start a project by writing up the project idea. Step 1. Sign up for a free Creator's Account to gain access to the Creator's Tools. Step 2. Login Step 3. Push the "Create New Project" button on the Creator's Tools. Make a name (you can change it later) for your project. And describe your plans to use as notes to guide the creation of the steps. Step 4. When you've finished providing all the steps to your project, shooting the videos and saving to google video via the Creator's Tool Panel, you are ready to write the introductory paragraph with an interesting story of how you did it, or how you do it in the case of a professional services presentation. Step 5. Last but not least create and upload the video (to YouTube) which is the video that will be used to summarize the project. If you were building a robot, this final video would show the robot running around, doing fun things that will inspire others to create their version of your project. That's it... Watch the views and ratings for your project pile up along with the sales commissions! Or get a customer because you showed how you remodel a house. |
FAQ About Becoming A CreatorQ. Why would I go to all that work, building something, then put it on a website like C What I Can Do? What's the point? A. Actually, there are a couple of forms for a reward:
|
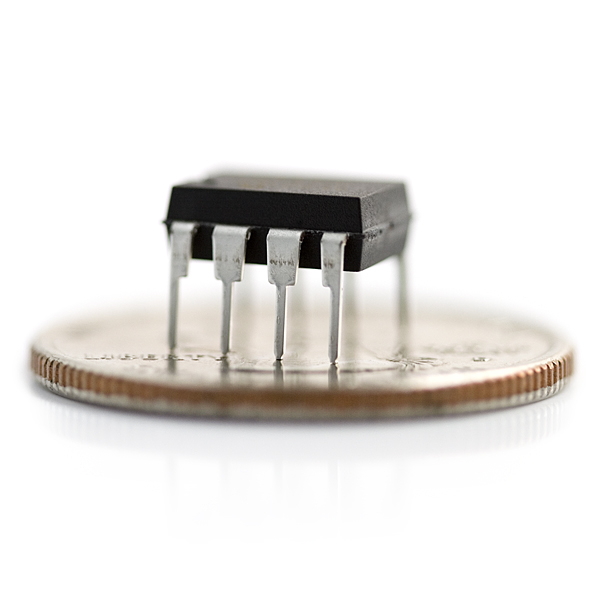
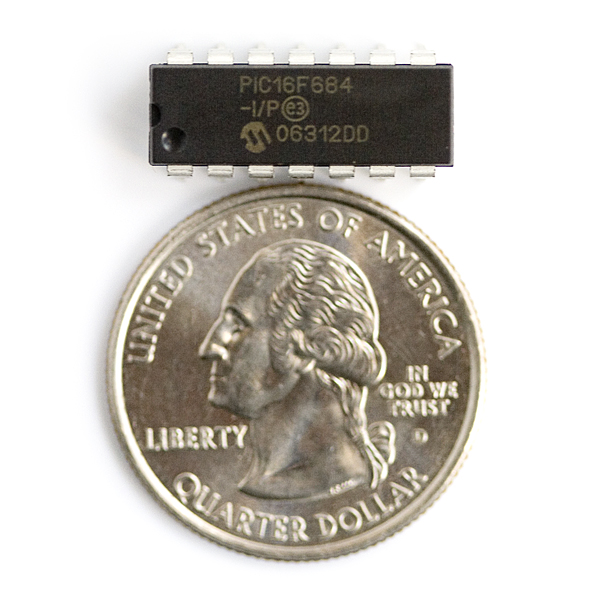
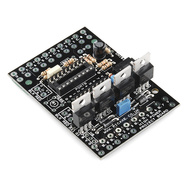
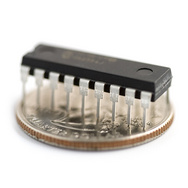
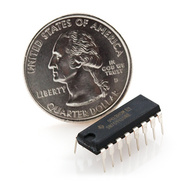
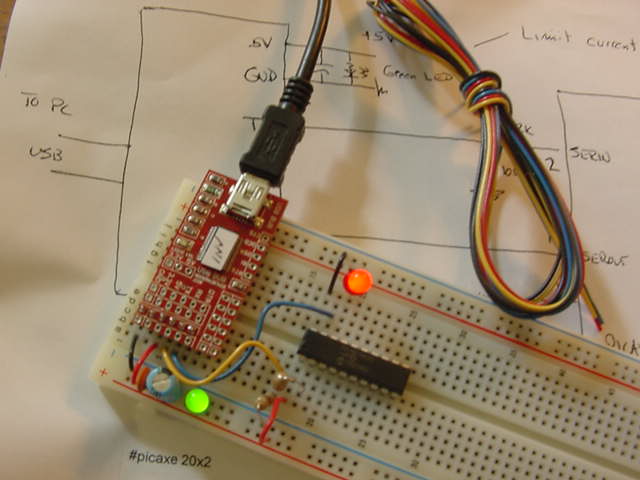
Light A 5X7 LED Matrix with picAxe 18M2 ... 32036 Views Author's name: weRbots This project grew out of an idea I got when I found a couple of 2057 Giant LED Matrix`s. I thought it would be fun to make faces for robots that could monitor the bot like a piece of test gear that sat right on the bot. I came up with a few ideas for dot matrix "faces" but it wasn`t just ultra-simple to wire in the matrices. They were designed to be driven row/column with the plus lines tied to column and the cathodes individually running out to pins on the display. Blah... I put it away for a while. Till the other day when the M2 parts arrived to replace the 18X part I blew up while fiddling around. Hey! These 18M2`s are pretty amazing. You can find a robot project right here on this site, and other information on the 18M2. My brain blasted when I realized as a consequence of being able to run four 4mHz processes at the same time, you could run one process at 4 X 4 16mHz. And the chip designers through in a treat, the setFreq m32 command. Now I had some speed, so I dragged out the 2057 and my soldering iron and went to work. The result is a dandy little 5X7 display that is crammed in behind the display so you could, if you wanted, stack `em in a message display. Thus this project was born! It is cool! It is Cheap! What a great project for CwhatIcanDo makers, hackers and circuit benders! Schematic Here`s the way I wired it. I`m including this plus the software just so you can trouble shoot. I recommend you take the other wiring approach so there will be a relationship between the numbers on the picAxe chip (B.0, C.0) and the row numbers. SOFTWARE LISTING: `````````````````````````````````````````````````` ` Faces for Robots ` Uses picaxe 18M2 to create a face screen for robots ` ` Rel 1.0 ` Needs serial interface to program ` Analog Input for data logging/comparison ` Digital Input for pcm control, or ser port for motor ctl ` Extra Output if you choose to chain more displays ` Uses: stopped, forward, turn signals, battery, ` Non-Robot uses: Walking Letters 90 degree rotation, ` ` `-------------------------------------------------- ` PicAxe 18M2 ` ` Pinout and Definition of Legs ` By Functional Definition `======================================= `(SRI / Out / In) B.0 leg 6 ` `(i2c sda / Touch / ADC / Out / In) B.1 leg 7 ` `(hserin / Touch / ADC / Out / In) B.2 leg 8 ` `(pwm / Touch / ADC / Out / In) B.3 leg 9 ` `(i2c scl / Touch / ADC / Out / In) B.4 leg 10 ` `(hserout / Touch / ADC / Out / In) B.5 leg 11 ` `(pwm / Touch / ADC / Out / In) B.6 leg 12 ` `(Touch / ADC / Out / In) B.7 leg 13 `--------------------------------------- `(Touch / ADC / Out / In) C.0 leg 17 ` `(Touch / ADC / Out / In) C.1 leg 18 ` `(DAC / Touch / ADC / Out / In) C.2 leg 1 ` `(SRQ / Out) Serial Out / C.3 leg 2* ` `(In) / Serial In / C.4 leg 3* ` `(In) old reset is now signal C.5 leg 4 `(Out / In) C.6 leg 15 ` `(Out / In) C.7 leg 16 ` `======================================= ` `----------````````````````````````````````------------------ ` The ideal wiring will hook it up this way: Your ` programming life will get so much easier ` ` B.0 B.1 B.2 B.3 B.4 B.5 B.6 Row 1 through 7 ` C.0 C.1 C.2 C.6 C.7 Col 1 through 5 ` ------------------------------------------------------------ ` Program Wide Symbols `Kick Butt! set it for extreme speed, ` sure it`ll eat more batteries, but you`re using rechargables! setfreq m32 `pins `here i discovered the importance of naming and wiring appropriately symbol row1 = B.3 `B.1 symbol row2 = B.0 `B.2 symbol row3 = B.2 `B.3 symbol row4 = B.1 `B.4 symbol row5 = B.4 `B.5 symbol row6 = B.6 `B.6 symbol row7 = B.5 `B.7 gives orderly bit alignment symbol col1 = C.6 `C.0, C.0 symbol col2 = C.1 `C.7, C.2 symbol col3 = C.2 ` , C.6 symbol col4 = C.7 `C.1, C.7 symbol col5 = C.0 `C.6 so much need -- so few bits symbol serialOut = C.3 symbol serialIn = C.4 ` system inputs : C.5 - pulsin/on_off and B.7 - analog/pulsin/on_off symbol p_button = C.5 symbol anaIn = B.7 symbol delay = 5000 ` just kept having to make it bigger symbol disp = 10 ` get going: set data direction registers for brute force! let dirsC = %11000111 ` 1 outputs, 0 inputs let dirsB = %01111111 ` 1 outputs, 0 inputs ` set up initial values for predictable operation let pinsC = %11000111 ` make all C outputs Low let pinsB = %01111111 ` turns the lights off :-) ` KEEP THIS TABLE HANDY ` Font making tools `w1 = %01000000 ` Column 1 `w1 = %00000010 ` Column 2 `w1 = %00000100 ` Column 3 `w1 = %10000000 ` Column 4 `w1 = %00000001 ` Column 5 `w2 = %01110111 ` Row #1 `w2 = %01111110 ` Row #2 `w2 = %01111011 ` Row #3 `w2 = %01111101 ` Row #4 `w2 = %01101111 ` Row #5 `w2 = %00111111 ` Row #6 `w2 = %01011111 ` Row #7 `w2 = %01111111 ` turns the lights off ` For my next act, I will simply OR these babies then blip ` `em a screenful at a time??? Nice experiment. hello: for b0 = 1 to 30 gosub H pause 100 next b0 for b0 = 1 to 30 gosub E pause 100 next b0 for b0 = 1 to 30 gosub el pause 100 next b0 `letter space time eater for b0 = 1 to 30 gosub zero pause 100 next b0 for b0 = 1 to 30 gosub el pause 100 next b0 for b0 = 1 to 30 gosub O pause 100 next b0 `word space for b0 = 1 to 100 gosub zero pause 100 next b0 world: for b0 = 1 to 30 gosub W pause 100 next b0 for b0 = 1 to 30 gosub O pause 100 next b0 for b0 = 1 to 30 gosub R pause 100 next b0 for b0 = 1 to 30 gosub el pause 100 next b0 for b0 = 1 to 30 gosub dee pause 100 next b0 `word space for b0 = 1 to 100 gosub zero pause 100 next b0 goto hello H: let pinsC = %01000000 ` Cols High to enable Rows let pinsB = %00000000 ` light row pause disp gosub zero let pinsC = %00000010 ` Cols High to enable Rows let pinsB = %01111101 ` light row pause disp gosub zero let pinsC = %00000100 ` Cols High to enable Rows let pinsB = %01111101 ` light row pause disp gosub zero let pinsC = %10000000 ` Cols High to enable Rows let pinsB = %01111101 ` light row pause disp gosub zero let pinsC = %00000001 ` Cols High to enable Rows let pinsB = %00000000 ` light row pause disp gosub zero return E: let pinsC = %01000000 ` Cols High to enable Rows let pinsB = %00101001 ` light row pause disp gosub zero let pinsC = %00000010 ` Cols High to enable Rows let pinsB = %01011100 ` light row pause disp gosub zero let pinsC = %00000100 ` Cols High to enable Rows let pinsB = %01011100 ` light row pause disp gosub zero let pinsC = %10000000 ` Cols High to enable Rows let pinsB = %01011100 ` light row pause disp gosub zero let pinsC = %00000001 ` Cols High to enable Rows let pinsB = %00111001 ` light row pause disp gosub zero return el: let pinsC = %01000000 ` Cols High to enable Rows let pinsB = %01111111 ` light row pause disp gosub zero let pinsC = %00000010 ` Cols High to enable Rows let pinsB = %01111111 ` light row pause disp gosub zero let pinsC = %00000100 ` Cols High to enable Rows let pinsB = %00000000 ` light row pause disp gosub zero let pinsC = %10000000 ` Cols High to enable Rows let pinsB = %01011111 ` light row pause disp gosub zero let pinsC = %00000001 ` Cols High to enable Rows let pinsB = %01011111 ` light row pause disp gosub zero return O: let pinsC = %01000000 ` Cols High to enable Rows let pinsB = %00101001 ` light row pause disp gosub zero let pinsC = %00000010 ` Cols High to enable Rows let pinsB = %01011110 ` light row pause disp gosub zero let pinsC = %00000100 ` Cols High to enable Rows let pinsB = %01011110 ` light row pause disp gosub zero let pinsC = %10000000 ` Cols High to enable Rows let pinsB = %01011110 ` light row pause disp gosub zero let pinsC = %00000001 ` Cols High to enable Rows let pinsB = %00101001 ` light row pause disp gosub zero return zero: let pinsB = %01111111 ` turns the lights off :-) return W: let pinsC = %01000000 ` Cols High to enable Rows let pinsB = %00000000 ` light row pause disp gosub zero let pinsC = %00000010 ` Cols High to enable Rows let pinsB = %00111111 ` light row pause disp gosub zero let pinsC = %00000100 ` Cols High to enable Rows let pinsB = %01101111 ` light row pause disp gosub zero let pinsC = %10000000 ` Cols High to enable Rows let pinsB = %00111111 ` light row pause disp gosub zero let pinsC = %00000001 ` Cols High to enable Rows let pinsB = %00000000 ` light row pause disp gosub zero return R: let pinsC = %01000000 ` Cols High to enable Rows let pinsB = %00001001 ` light row pause disp gosub zero let pinsC = %00000010 ` Cols High to enable Rows let pinsB = %01111011 ` light row pause disp gosub zero let pinsC = %00000100 ` Cols High to enable Rows let pinsB = %01111110 ` light row pause disp gosub zero let pinsC = %10000000 ` Cols High to enable Rows let pinsB = %01111110 ` light row pause disp gosub zero let pinsC = %00000001 ` Cols High to enable Rows let pinsB = %01111011 ` light row pause disp gosub zero return Dee: let pinsC = %01000000 ` Cols High to enable Rows let pinsB = %00101101 ` light row pause disp gosub zero let pinsC = %00000010 ` Cols High to enable Rows let pinsB = %01011011 ` light row pause disp gosub zero let pinsC = %00000100 ` Cols High to enable Rows let pinsB = %01011011 ` light row pause disp gosub zero let pinsC = %10000000 ` Cols High to enable Rows let pinsB = %01011011 ` light row pause disp gosub zero let pinsC = %00000001 ` Cols High to enable Rows let pinsB = %00100000 ` light row pause disp gosub zero return Programming Your LED Matrix It`s pretty simple. You have to keep refreshing this to fool the eye into thinking all the lights are lit at once. Really, all the Row Leds are what light up at any one time. Comment out the SETFREQ command and you can watch it run slowly... Make the column you want to energize a logic one... on a picAxe you can say high C.0, for example. While you hold the high state on the column select the rows that should be on. For "H", you would turn all rows high in col 1, counting left to right: LOW Row1,Row2,Row3,Row4,Row5,Row6,Row7 or, if you use the suggested schematic: let pinsB = %00000000 When column 1 shows up, it simply lights up all the LEDs in a row by shorting through a 47 Ohm resistor. Remember you are pulsing the LED`s so you can hit them with more current at once, they are only on for 1/5 the time anyway. You can imagine with all seven rows Low, and all seven LEDs lit, things will get dimmer in that column. That`s why the setFreq m32 command is in there, everything happens so fast, you hardly notice the flickering (in the video, things are actually running slow at times). If you still can`t let go of the math, you will still have problems with brighter bars appearing where there is only one or two LED`s in the stream. To fix this, you would need a constant current generator to supply 10ma to only one LED, and jack up the voltage to supply 10ma more each time another LED is called into service. In the real world there will be limits, and I originally started out here just to make faces, these work great and I simply keep refreshing the face so it looks like all the dots are on all the time to human`s who are watching. For this, the cheap and dirty approach works great... Next Steps N Suggestions I`m gonna see if I get a picAxe 20m2 to replace the 18 pin model. Or maybe a 28m2? I like the 20 because it`s very inexpensive. I think I want one of those. And, I think I will drive more matrices either by using the extra pins to enable the other matrices. I`ll put a voltage divider into the analog input and use the value to choose "how happy" the face really is.... It's Easy To: C - What - I - Can - Do • Sign up - Get ID and Password• Plan and Create a Project That Someone Might Enjoy and May Even Want to Build• Link to your creation on your favorite social networking site or blog.• Become famous! Because your projects get a lot of Hits!
|
By Creators DoctorZoidberg: Converting a Flashlight to LED DoctorZoidberg: Home Project: MUTE TV Wearable TV Muter! DoctorZoidberg: Scare Crow - For Modern Gardens - Home Project jim: CwhatIcanDo Website jim: Tour This Website PaulSandin: Butler, a low-cost mobile robot base WeRbots: BEAM BOT: HexBug Exposed! WeRbots: Buggy Bot: Wire Frame Bot Body WeRbots: Easy Cheap Robot Weekend Project WeRbots: RFL Robot Out Of The Box Experience WeRbots: Robot Man: With Robot Demos WeRbots: Build Your Own Track Drive Robot WeRbots: Build a Robot In 5 Minutes WeRbots: i-Mon App WeRbots: How To Make A Virtual Robot in FLASH WeRbots: Droid From Motorola :: A Robot ? WeRbots: Robots Almost Anyone Can Afford WeRbots: How To Build a Robot in a Box WeRbots: picAxe 18m2 for robotics WeRbots: Build a Respectable Autonomous Robot WeRbots: On Line Neighborhood Watch WeRbots: Pong))))) WeRbots: Roboteer`s Guide to BeagleBone Black WeRbots: Autonomous Robot PVC "Pickup Truck" |
By Keywords Action Script 2: How To Make A Virtual Robot in FLASH Ajax: CwhatIcanDo Website Ajax: CwhatIcanDo Specs: RC2 Ajax: battle Android: Droid From Motorola :: A Robot ? Android: battle batting cage installation: Home Installation of a 4 Section In-Ground Batting Cage BEAM Robots: BEAM BOT: HexBug Exposed! BEAM Robots: picaxe 8m: Wall Follower Mouse gets Majorly Modded BEAM Robots: How to build simple analog balancing robots BEAM Robots: battle Block Watch Cam: On Line Neighborhood Watch Cheap Robot: Easy Cheap Robot Weekend Project Cheap Robot: How To Build a Robot in a Box Cheap Robot: Autonomous Robot Built From Power Chair Wheelchair commercial killer: Home Project: MUTE TV Wearable TV Muter! Convert Your Flashlight to LED: Converting a Flashlight to LED Create a Project: HELP :: How To Create a Project CwhatIcanDo HELP: HELP :: How To Create a Project Do it Yourself: Robots Almost Anyone Can Afford Do it Yourself: Scare Crow - For Modern Gardens - Home Project Do it Yourself: Wheelchair Works 3 Ways: Manual, R/C, and Autonomous Do it Yourself: On Line Neighborhood Watch Droid Smart Phone: Droid From Motorola :: A Robot ? Easy to Make Robot: Easy Cheap Robot Weekend Project entertainment: Home Project: MUTE TV Wearable TV Muter! FLASH Applications: How To Make A Virtual Robot in FLASH HELP: Tour This Website How To: CwhatIcanDo Website How To Build Cheap Bots: Robots Almost Anyone Can Afford How To Build Cheap Bots: How To Build a Robot in a Box How To Website: Tour This Website How To Website: CwhatIcanDo Website Infrared Proximity Sensor: Build Your Own Track Drive Robot IR Detector: Build Your Own Track Drive Robot Lighting Projects: Converting a Flashlight to LED logic analyzer: An affordable Logic Analyzer for the workbench. multi: Multi Media Messaging Device Mute the TV: Home Project: MUTE TV Wearable TV Muter! open source: An affordable Logic Analyzer for the workbench. picAxe: Build Your Own Track Drive Robot picAxe: picAxe 18m2 for robotics picAxe 08m: Robots Almost Anyone Can Afford picAxe 14m: picAxe 14m Motor Driver Board: Make Your Own picAxe 14m: How To Build a Robot in a Box picAxe 18m2: picAxe 18m2 for robotics picAxe 18m2: Weekend Project: Get Started With Robots picAxe 18m2: Build a Robot From A Power Wheelchair picAxe 18m2: Autonomous Robot Built From Power Chair Wheelchair picAxe 18m2: Wheelchair Works 3 Ways: Manual, R/C, and Autonomous picAxe 18x: How To Build a Robot in a Box picAxe 18x: picAxe 18m2 for robotics picAxe 18x: Build a Robot From A Power Wheelchair power wheelchair: Wheelchair Works 3 Ways: Manual, R/C, and Autonomous Quick Build Robot: Build a Robot In 5 Minutes RFL Robots: Building an RFL Inspired Upright Robot Base RFL Robots: RFL Robot Out Of The Box Experience robot bending: Morphibian Land Shark robot bending: Build a Robot From A Power Wheelchair Robot Man: Robot Man: With Robot Demos Robot Motor Control: Build the L298 H-Bridge Motor Control Robot Motor Control: Robot Basics Robot Motor Control: picAxe 14m Motor Driver Board: Make Your Own Robot Motor Control: Buggy Bot: Wire Frame Bot Body Robot Motor Control: picAxe 8 bit Motor Controller: Look Inside Robot Motor Control: How to build simple analog balancing robots Robot Motor Control: Build a Robot From A Power Wheelchair Robot Motor Control: Autonomous Robot Built From Power Chair Wheelchair Robot Pets: DogBot the Robo Dog : Robotic WatchDog Robot Pets: Operation of the Tri-Bot From Wowwee! Robot Pets: Robot Man: With Robot Demos robotics: Droid From Motorola :: A Robot ? robotics: Easy Cheap Robot Weekend Project Robots: BEAM BOT: HexBug Exposed! Robots: Robot Basics Robots: Buggy Bot: Wire Frame Bot Body Robots: Build a Robot In 5 Minutes Robots: Build Your Own Track Drive Robot Robots: Easy Cheap Robot Weekend Project Robots: How To Build a Robot in a Box Rumble Bot Conversions: Robots Almost Anyone Can Afford Security System: On Line Neighborhood Watch Select or type in a Keyword: Converting a Flashlight to LED track drive robot: Build Your Own Track Drive Robot Virtual Pet Robot: How To Make A Virtual Robot in FLASH web: CwhatIcanDo Website web 2.0 site: CwhatIcanDo Website web 2.0 site: CwhatIcanDo Specs: RC2 Weekend Project Robots: Easy Cheap Robot Weekend Project Weekend Project Robots: Weekend Project: Get Started With Robots |
Click To Expand / Contract Menus. View by Creator, Category, Keywords or Number of Views.